How to implement Single Sign-on (SSO) using SSOfy
About $0 to $2500 based on project scale
About One day
OAuth2 is a widely recognized standard that has been embraced by many IT organizations to secure their login process and safeguard their users' privacy.
SSOfy is a cloud-based, developer-first OAuth2 SSO server that merges into the existing application's authentication flow and equips websites and applications with authorization and SSO functionality as a solid alternative to costly and time-consuming in-house development supporting both single and multi-tenant applications.
Achieving the same level of security and compliance that SSOfy possesses can take months or years. SSOfying you system can reduce this to as little as one to three days!
(✅ Estimated based on practical trials)
This article will provide you with an overview that may give you an idea of how SSOfy can be seamlessly integrated with your existing services from a developer's perspective so that you can make the most of Single Sign-On (SSO) technology in an efficient way.
Procedure:
- Get your SSOfy accountAbout $0 to $2500 based on project scale
- Create your first Application
- Visit your login page
- Serving data to SSOfy
- Getting User Info
- Conclusion
Step 1: Get your free SSOfy.com account!
Simply register with your email address or one of the accepted social account options.
If everything went well, you should be in the dashboard now.
If everything went well, you should be in the dashboard now.
Step 2: Create your first application
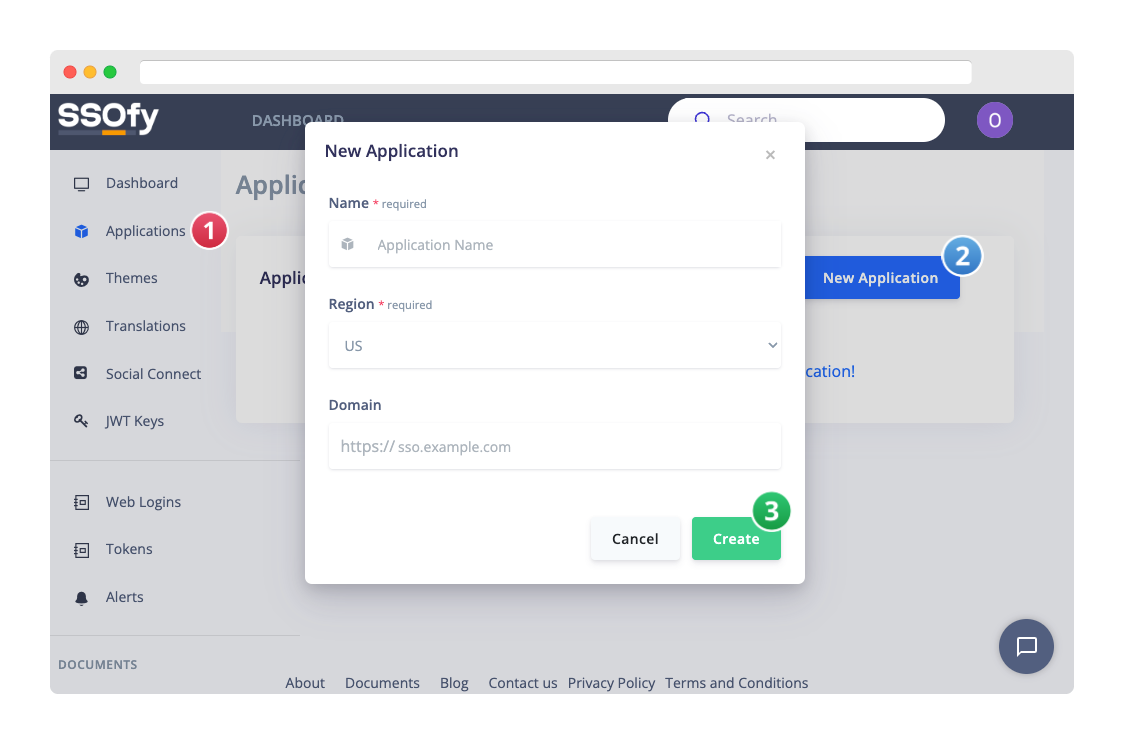
Make a profile for your application.
Navigate to the Applications page in the dashboard's sidebar and click the "New Application" button.
Navigate to the Applications page in the dashboard's sidebar and click the "New Application" button.
- Give your application profile a name.
- Choose your preferred SSO server region.
- Optionally, enter your custom SSO domain. (i.e. sso.example.com)
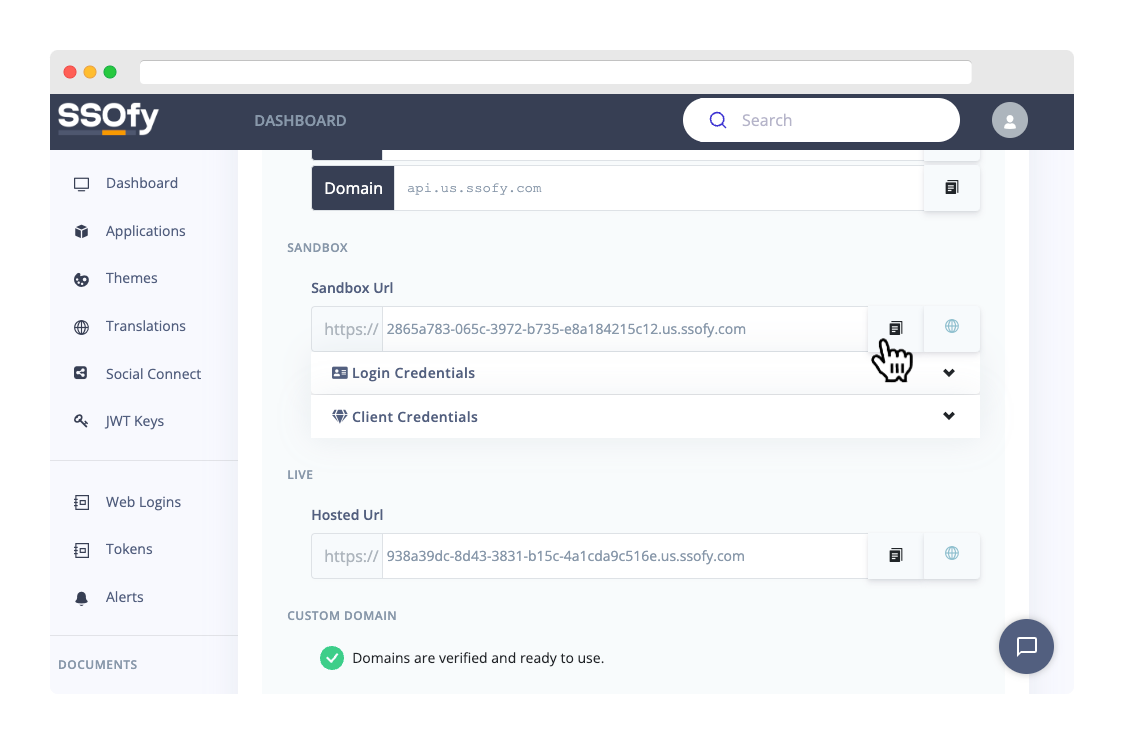
Step 3: Visit your login page
The sandbox feature of SSOfy allows you to view and test your configurations without initially connecting to your data source (ResourceServer).
From your application profile page,
From your application profile page,
- Scroll down to the Sandbox section and copy the url.
- Access your page using an offline or online OAuth2 testing and debugging tool, such as https://oauthdebugger.com.
Fill in the necessary parameters as follows:Authorize URI Paste the URL here and finish the path with /authorize. Example: https://SANDBOX-URL/authorize
Client ID sandbox Scope profile email Response Type code Token URI Paste the URL again and finish the path with /token. Example: https://SANDBOX-URL/token
PKCE ON - Click the Send Request button.
Step 4: Serving data to SSOfy
In this example, we're using some basic json files to show you how things work. But it's important to remember that this isn't the safest way to give SSOfy data. When you're using SSOfy in a real-life situation, you should always sign your messages. That way, you can make sure that your communication is as secure as possible.
SSOfy, by default, will not allow you to use unsigned messages. But don't worry; we can temporarily disable that function to test things out.
SSOfy, by default, will not allow you to use unsigned messages. But don't worry; we can temporarily disable that function to test things out.
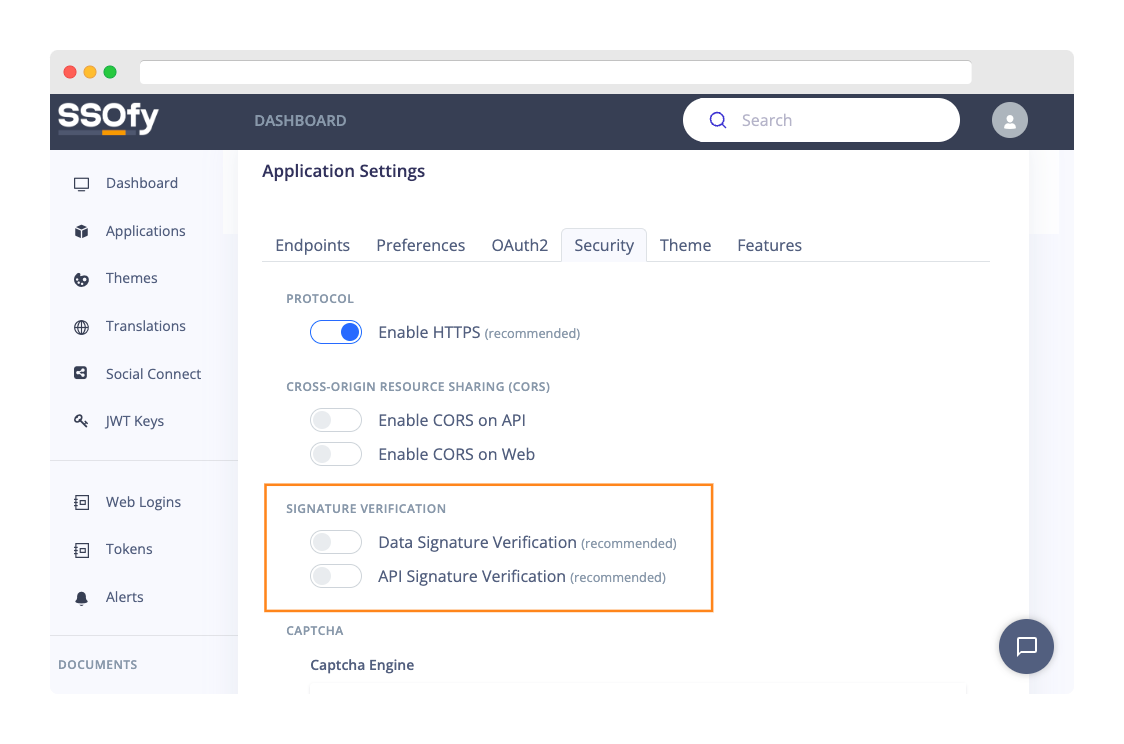
Disabling Signature Verification
Navigate to the Configuration page of your application.- Open the Security tab.
- Find the Signature Verification section.
- Toggle off Data and API signature verification options.
- Click Update.
Creating Files
Let's now create our files! Start by creating an empty directory and then create the following files with their respective contents:
mkdir test && cd "$_"./client.json
{
  "id": "test",
  "name": "Test Client",
  "secret": "secret",
  "redirect_uris": [
    "*"
  ]
}
./scopes.json
[
  {
    "id": "email",
    "title": "Your email address.",
    "icon": "fa-envelope"
  },
  {
    "id": "profile",
    "title": "Access to information like name, birthday and gender.",
    "icon": "fa-user-shield",
    "description": null,
    "url": null
  }
]
./user.json
{
  "id": "1",
  "hash": "1",
  "display_name": "Test User"
}
./auth.json
{
  "user": {
    "id": "1",
    "hash": "1",
    "display_name": "Test User"
  }
}
Serving Files
We need a static file server with global access to our files. We can use a combination of two popular Node.js modules for this: ngrok generates a unique url for you. We need to configure SSOfy to use this url to access our data.
In the Configuration page of your application:
npm i ngrok serve-staticexport TEST_PORT=8080
node -e "process.title='ssofy-test';require('http').createServer((req,res)=>{req.method='GET';res.setHeader('Access-Control-Allow-Origin','*');res.setHeader('Access-Control-Allow-Headers','*');res.setHeader('Content-Type','application/json');require('serve-static')('.')(req,res,()=>{res.statusCode=404;res.end()})}).listen(process.env.TEST_PORT)" &
ngrok http $TEST_PORT && kill $(ps aux | grep 'ssofy-test' | awk '{print $2}')
In the Configuration page of your application:
- Open the Endpoints tab.
- Update the API endpoints pointing to your files. Example:
Scopes https://NGROK-URL/scopes.json
Client https://NGROK-URL/client.json
User https://NGROK-URL/user.json
Password Authentication https://NGROK-URL/auth.json
Testing Live Environment
The process of testing the live environment is pretty much similar to that of the sandbox, with the exception that all data and configurations are now read from your provided endpoints.
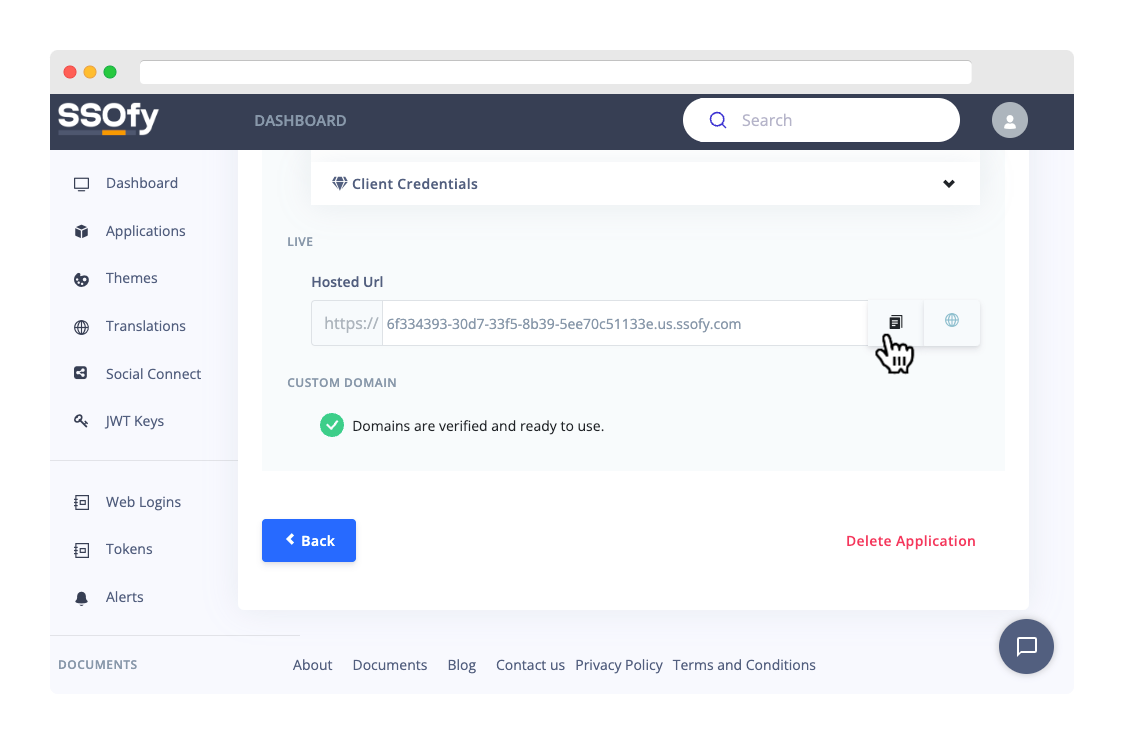
Grab your Hosted URL from the application page:
Access your live page:
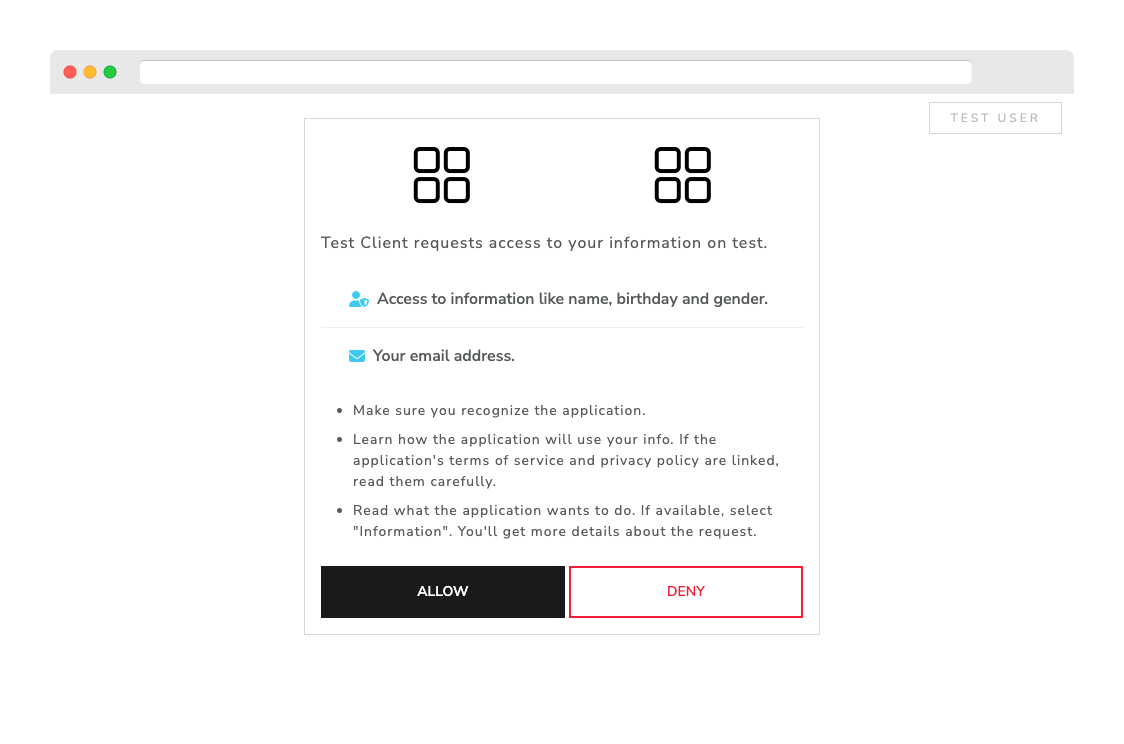
Login requests will be sent to https://.../auth.json for authentication. As we are serving simple files, the login credentials you use can be anything. With endpoints provided by a reliable backend, you essentially will have full control over the authentication process.
After logging in, you will proceed through the Authorization process. This is where we believe that transparency is best demonstrated in SSOfy. Any modifications to the scopes.json will be promptly reflected on the authorization page.
Grab your Hosted URL from the application page:
- Go back to your application page.
- Scroll down to the Live section.
- Copy the Url.
📌 If you have set up custom domains, ensure that you have followed all the instructions to verify your domain ownership. Once verified, you can use your domain url to access the login page as well.
Access your live page:
- Open your OAuth2 testing tool.
- Adjust the Authorize URI and Token URI respectively. Example:
https://LIVE-URL/authorize
https://LIVE-URL/token
- Change the Client ID to test as given in the client.json file.
- Click Send Request button.
Login requests will be sent to https://.../auth.json for authentication. As we are serving simple files, the login credentials you use can be anything. With endpoints provided by a reliable backend, you essentially will have full control over the authentication process.
After logging in, you will proceed through the Authorization process. This is where we believe that transparency is best demonstrated in SSOfy. Any modifications to the scopes.json will be promptly reflected on the authorization page.
Step 6: Getting User Info
Once you have the Access Token, we can try getting the user info by making a curl request to the /userinfo path.
curl --location 'https://LIVE-URL/userinfo' \
--header 'Authorization: Bearer YOUR-ACCESS-TOKEN'
Just like the previous step, any changes to the user.json file will be reflected in the userinfo endpoint.
Conclusion
You learned that SSOfy is a powerful solution that offers flexibility and ease of integration, making it suitable for a wide range of development scenarios. Whether you need to manage access to multiple systems, automate authentication processes, or enhance security, SSOfy can help you achieve your goals.
SSOfy stands out from other authentication servers with its "opaque" nature. This means that it operates transparently and without interfering with your existing systems. SSOfy can connect with your systems seamlessly, allowing you to use it without disrupting your workflow. This can save you time and money by reducing the need for complex integrations or custom development work.
Another benefit of SSOfy is its "no-store" policy. Unlike some other authentication services, SSOfy does not store any of your company's data. This means that your data remains private and secure, even when using SSOfy to manage access to your systems. This can give you peace of mind and help you comply with data privacy regulations.
Now that you know the development basics, it's time to delve deeper into SSOfy's unique features. Each of these features has been carefully crafted to meet the needs of professional teams. You can customize SSOfy to fit your unique requirements and achieve your goals with confidence.
- Based upon the well-established OAuth2 protocol.
- Customizable user interfaces for seamless integration with your brand.
- Integration with popular identity providers, such as Google and Facebook.
- Support for a wide range of JWT signing algorithms.
- Hybrid approach with Single Sign-out support.
- Advanced analytics and reporting to help you track usage and identify potential security risks.